Saturday 21 June 2014

The Lizard King !

My quirky side kicked in for piece and I love it!! Very different and just plain fun!

This was done in a one inch deep box frame. First of all I randomly brushed over the background using Pèbèo Studio acrylics . Then painted the frame in black. Set it aside to dry while I gilded the little toy rubber lizard. Isn't he just cute!.I then painted in some black triangles around the inside edge of the box. I used the gilding outliner paste to draw zig zag lines down the sides of the frame and once that had dried I then used foil sheets to gild the lines. I painted the feet of the lizard and used it as a 'stamp' to give the footprints. The quote is done on  two ice-lolly sticks which were painted in the same colours as the background. Stuck everything down and let it dry.
I then used the Pèbèo Crystal resin and mixed up enough to embed everything in resin.
A REALLY fun and quirky piece which has slight 'Tribal' feel to it. Really had fun with this and just let my quirky side come out on this one.

Thanks for dropping by

Take care
Jackie x

Altered Mirror.

First of all I must apologise for this photograph. Mirrors and flash photography don't mix! Hence the piece of card in the middle.

Anyway, this was one of those inexpensive little mirrors from Ikea. A very plain wooden frame crying out for some altering.
I used Pèbèo Studio Acrylics for the background which was just randomly brushed on. I then used the Studio texture paste 'White Sand' and stencilled through a home made stencil. While this was drying I gilded some little chipboard frames with copper gilding flakes and stuck them down to the corner of the frame. I used some Pèbèo Fantasy Moon and Fantasy Prisme paints and poured them into the mini frames. While that set aside drying I used the same paint on the little tiles, which are actually the insides of the mini frames. Once they were fully dry I then painted the edges of the tiles with some copper colour paint from my stash to tone them in with the frames on the bottom corner.
I used Pèbèo Studio acrylics in metallic colours to match the background and randomly brushed over the texture paste to tone in the swirls and also just randomly brushed the rest of the background to finish it off.

A nice little project this one and I like they way it turned out.

Thanks for dropping by.

Take care
Jackie x

Gilded Timepiece

Now this project I DID have fun with! Took me nearly three days but there is a LOT of work involved.

The background was done using Pèbèo Studio Acrylic  randomly brushed over the 20x8" canvas. While it was drying I set about making and gilding the flowers.
These were done using a rubber stamp. I stamped  out the flower ten times then cut them out. I then brushed over the gilding glue and set them aside to dry, meanwhile, I cut the cogs and gearwheels and the weathered clock using my Bigshot machine. I then brushed on some gilding glue and set these aside to dry. Now the flowers are dry I just popped then into my box of gilding flakes. Brushed off the excess and then gave them a coat of Terracotta and Green alcohol inks as I wanted to give them a 'rusty' look. I just did the same with cogs.
I constructed all the flowers ( there is a good tutorial for this over on The Artistic Stamper blog by the way). Glued them down with a hot glue gun and used glass beads for the centres. The cogs, gearwheels and clock are stuck down with p.v.a. glue.
I used Pèbèo Fantasy Moon and Fantasy Prisme paints for the dribbles. Love the effects of these two paints when the mix together.

The quote was done in gold marker pen on a scrap piece of card which was sprayed with Copper Cosmic Shimmer. I used dome copper paint and gold paint from my own stash to stencil through dome sequin waste randomly over the rest of the painting and then just gave a light spray of the Cooper Cosmic Shimmer to finish.

REALLY pleased with the way this turned and it is one of my favourite pieces.

Thank you for dropping by.

Take care

Jackie x

Friday 20 June 2014

More from Pèbèo - 'Imperfect Pearls.

Hello again,  been having another play with some more Pèbèo products and came up with this.
Done on a canvas board usinf Pèbèo Studio acrylic paint for the background along with a couple of metalic colours. After it was dry I then used some of the Gold outliner paste and drew some lines and uneven circles. When that was dry I added some Pèbèo Fantasy Moon and Fantasy Prisme paints to the inside of the circles. Set it aside to dry and this was how it ended up looking. Quite like the way it turned out actually. Not quite brilliant but not too bad...just right.

Thanks for dropping by

Have a great weekend

Jackie

Sunday 15 June 2014

Pèbèo shout out !!

Hello everyone, it has been a wee while since I last blogged and as usual it is just life and other stuff getting in the way.

I was lucky enough to receive a mahoosive box of goodies from Pèbèo recently and was asked to "create stuff" using their products. I was thrilled to bit but also very nervous as well because I haven't used their products before. So I set about watching some online videos and tutorials to give me an idea of what I could and couldn't do.

Didnt take me long to come up with ideas though and the photo above is my first project.
In the box were these little wooden frames and I wasn't really sure what I was going to do with the so I just poured in some Fantasy Moon and Some Prisme paints. Left it to dry overnight to see what I had as an end result and thought I would work from there. I LOVE these paints!! What a gorgeous result!!

Just adore the way these paints interact with each other while drying! I then set about decorating the frames. Tried to theme it to match the colours inside. The orange one looked like 'fire' so I went with that. I randomly applied some modelling paste to the frame and when it was dry I roughly mixed some of the Pèbèo Studio acrylics and roughly painted to suit.

I decided to go with an 'ice' theme for the other one and used the Studio acrylics White Sand texture gel. I thought itvlooked like snow when it was dry but I just coloured it using the acrylic paints again.
I was really plwasantly surprised with thexway this duo came together and love the way they have turned out. These wee frames have little magnets embedded in the back and would really sweet fridge ornaments or be stuck to anything metal for that matter.

So, pleass watch this space for more Pèbèo projects .

Thanks for dropping by.

Take care

Jackie x

Friday 6 June 2014

Bloom Where You're Planted.


Many apologies yet again for my lack of blogging and neglecting you all but life just seems to be getting in the way at the moment.

Anyway, I did however manage to make a little time for myself and do some creating. It took two days in fact but it was loads of fun to watch this piece develop!

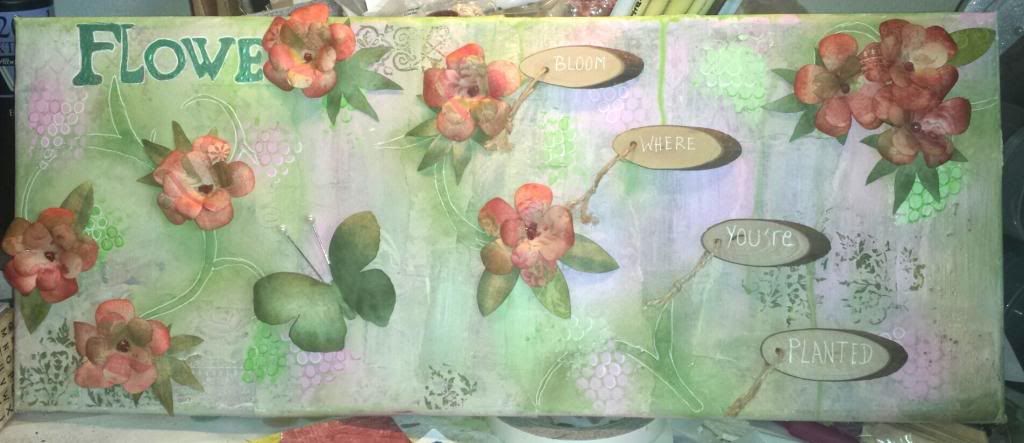
20 x 8 inch mixed media canvas. Many apologies for the quality of the photo though as it was taken on my mobile phone.

I didn't really have a plan with this piece so i just "went with it" so to speak. I decided to dig into my scrapbook paper stash and use some of it. I have way too many packs and they are beginning to overtake my cupboard spaces!
So, I grabbed a couple of floral and patterned packs and tore up a few sheets with a similar colour scheme and proceeded to 'wallpaper' my canvas. I wasn't bothered about bubbles o ceases because I always feel it adds a bit of texture! Once it was dry i sanded the whole thing down to take some of the shine from the glue off as it was P.V.A I used. gave it a dusting off then a whitewash of watered down gesso. I mixed up some pale pink acrylic paint and some pale green  and then just randomly brushed that over in laces on the background. Again when dry, I sanded it down and then added the next layer. This was done by using modelling paste through a handmade stencil. Set the whole aside to dry and went for a cup of coffee!

Coffee break over - modelling paste dry - time for colour! I dry brushed over the swirls with some pale green acrylic paint and let dry. Once this was dry I set about with some background stamping using a random mixture stamps from my stash. some of the stamping is a little subtle and doesn't really show up in the photo but trust me, it IS there!

At this point I am still feeling it is looking a little 'flat' so decided to see if I could highlight some of the details in the background papers. The word 'flower' was barely visible so I drew round what I could see of it and painted it using Twinkling H20's. Thought I'd be smart and dry it with the heat gun to hurry it up a little and lo'n'behold it started to blister and bubble! Wow! I liked that so left it! I highlighted it with a white Sakura gel pen, along with the details on the swirls.

Now onto the flowers! Theses were made using an outline flower stamp. I stamped  some large petals onto the back of some of the patterned paper I used for the background, same thing for the small petals. Also did two styles of leaves and then spent time cutting them all out. I edged the petals and leaves with some distress inks to finish them off a little. Once they were all constructed I laid them out on my canvas to give me an idea of where I wanted them placed or where I felt they looked right, then proceeded to finish off the details with some more stamping, and also some sequin waste stencilling!
 Flowers are all glued down with a hot glue gun and the centres were added using some glitter glue, but there is a big space...hmmm...what to do... Ah a Butterfly! Stamped onto the back of some patterned paper and cut it out, stuck it down with a hot glue gun and some dressmakers pins for the antennae, but I might just see if I can a smaller layer to this as I am not really too keen on the way it looks, i may just add some white pen details to it instead.

Anyway, I added a quote to a pack of mini wooden plaques I bout for under a quid at a high street store, tied on some string and then glued them down with a hot glue gun.

Finished off the edges a little better to neaten the whole thing up and then stepped back. Yup! It's finished, no more fiddling!!

REALLY pleased with this piece seeing as it was a 'totally go for it' piece! Love when this happens as it is can be a nice surprise if it turn out the way you see it when putting it together!

Thank you for dropping by, take care and enjoy your day.

Jackie x