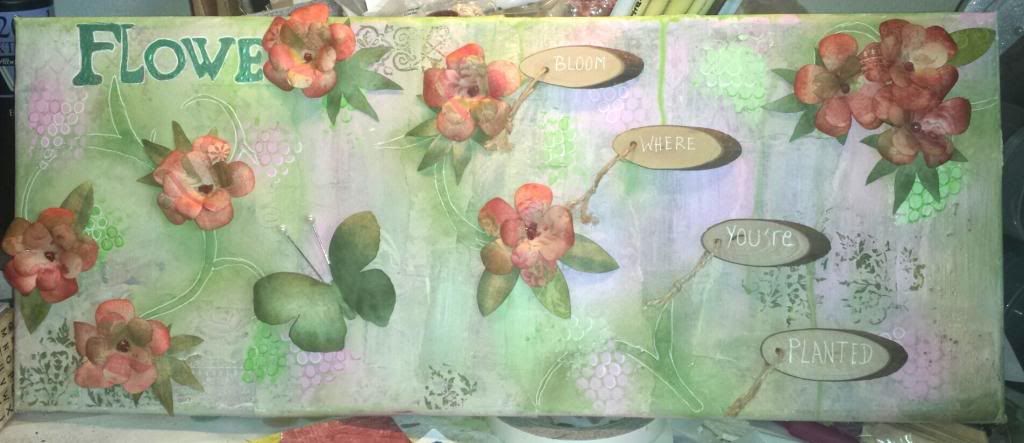
Anyway, I did however manage to make a little time for myself and do some creating. It took two days in fact but it was loads of fun to watch this piece develop!
20 x 8 inch mixed media canvas. Many apologies for the quality of the photo though as it was taken on my mobile phone.
I didn't really have a plan with this piece so i just "went with it" so to speak. I decided to dig into my scrapbook paper stash and use some of it. I have way too many packs and they are beginning to overtake my cupboard spaces!
So, I grabbed a couple of floral and patterned packs and tore up a few sheets with a similar colour scheme and proceeded to 'wallpaper' my canvas. I wasn't bothered about bubbles o ceases because I always feel it adds a bit of texture! Once it was dry i sanded the whole thing down to take some of the shine from the glue off as it was P.V.A I used. gave it a dusting off then a whitewash of watered down gesso. I mixed up some pale pink acrylic paint and some pale green and then just randomly brushed that over in laces on the background. Again when dry, I sanded it down and then added the next layer. This was done by using modelling paste through a handmade stencil. Set the whole aside to dry and went for a cup of coffee!
Coffee break over - modelling paste dry - time for colour! I dry brushed over the swirls with some pale green acrylic paint and let dry. Once this was dry I set about with some background stamping using a random mixture stamps from my stash. some of the stamping is a little subtle and doesn't really show up in the photo but trust me, it IS there!
At this point I am still feeling it is looking a little 'flat' so decided to see if I could highlight some of the details in the background papers. The word 'flower' was barely visible so I drew round what I could see of it and painted it using Twinkling H20's. Thought I'd be smart and dry it with the heat gun to hurry it up a little and lo'n'behold it started to blister and bubble! Wow! I liked that so left it! I highlighted it with a white Sakura gel pen, along with the details on the swirls.
Now onto the flowers! Theses were made using an outline flower stamp. I stamped some large petals onto the back of some of the patterned paper I used for the background, same thing for the small petals. Also did two styles of leaves and then spent time cutting them all out. I edged the petals and leaves with some distress inks to finish them off a little. Once they were all constructed I laid them out on my canvas to give me an idea of where I wanted them placed or where I felt they looked right, then proceeded to finish off the details with some more stamping, and also some sequin waste stencilling!
Flowers are all glued down with a hot glue gun and the centres were added using some glitter glue, but there is a big space...hmmm...what to do... Ah a Butterfly! Stamped onto the back of some patterned paper and cut it out, stuck it down with a hot glue gun and some dressmakers pins for the antennae, but I might just see if I can a smaller layer to this as I am not really too keen on the way it looks, i may just add some white pen details to it instead.
Anyway, I added a quote to a pack of mini wooden plaques I bout for under a quid at a high street store, tied on some string and then glued them down with a hot glue gun.
Finished off the edges a little better to neaten the whole thing up and then stepped back. Yup! It's finished, no more fiddling!!
REALLY pleased with this piece seeing as it was a 'totally go for it' piece! Love when this happens as it is can be a nice surprise if it turn out the way you see it when putting it together!
Thank you for dropping by, take care and enjoy your day.
Jackie x

No comments:
Post a Comment